2012-02-25

Adding Add This

I think the easiest way to explain is to give you the original script given by "Add This" which I will put in the scroll box below:

<!-- AddThis Bookmark Button BEGIN -->
<script type="text/javascript">
addthis_url = location.href;
addthis_title = document.title;
addthis_pub = 'enviroman';
</script><script type="text/javascript" src="http://s7.addthis.com/js/addthis_widget.php?v=12" ></script>
<!-- AddThis Bookmark Button END -->


Here is the edited script with the addition colored red. You will only see one red addition in the scroll box. You will have to scroll down to see the other:

<div>
<!-- AddThis Bookmark Button BEGIN -->
<script type="text/javascript">
addthis_url = location.href;
addthis_title = document.title;
addthis_pub = 'enviroman';
</script><script type="text/javascript" src="http://s7.addthis.com/js/addthis_widget.php?v=12" ></script>
<!-- AddThis Bookmark Button END -->
</div class='post-footer>


Also, note that it has the line:

addthis_pub = 'enviroman';

which identifies my account with this "Add This" bookmarking widget. You cannot use the script above directly. You will have to go to Add This site, sign up for your own account, get your own script, and if you want to get it to work straight away with Blogger, just add the codes colored red above.
Print Page For Post

This is what you need to do. As usual, BACKUP your template before you make any changes to the template. See Backing up and changing New Blogger template.

In your template, paste this script just below the tag: (actually, it can be anywhere between the and tags, but pasting it immediately after the tag is the easiest and the easiest to explain):

Preview, and if everything seems OK, click "Save Template"

Then in one of your post (or all your posts if you want) put this at the bottom of the post in the post editor window:

Print Page

If you want the "Print Page" to appear in all your post, go to SETTINGS > FORMATTING and paste the above into the post template window.

To see an example, go to My Photo Store. I have only put "Print Page" in the first post (sticky post) "Picassa - Google Photo software". Don't try clicking on this button if you have your printer connected and switched on. You are going to waste a lot of paper. Install CutePDF writer (search for that in the search box above for the site to install this). You will have to install 2 things, the free CutePDF writer and the free GPL Ghostscript 8.15 converter. An extra option will be added to your choice of printers. If you have that installed, click "Print Page" and select "CutePDF Writer" as the printer and the page will be printed to a PDF file, saving you lots of paper and ink/toner.

Add Sitemap To Google

To add Google sitemap to your blog, go to Google sitemap, and sign in with your Google Account (create one if you don't have one). In the Add site box, enter your blog url as shown in the screenshot below, and click OK. (In this post, there will be many screenshots. To enlarge them, click on the screenshot)

You will get a "Your site has been added to your account. Verify your ownership to view detailed statistics and errors for it" message and a button to verify your ownership.

Click the "Verify" text hyperlink, and you will be taken to a selection box to select your verification method.

Choose "Add a Meta tag". A meta tag will be generated for you.

Highlight this meta tag and copy it to clipboard. Sign into Dashboard, select your blog, click TEMPLATE tab and paste the meta tag in between the and tags. Save and republish. Check the "I've added the META tag in the home page of http://your-blog-url.com/" box and click the [verify] button.

There will be a message "We do not know about all the pages of your site. [Submit a Sitemap] to tell us more about your site. Click [Submit a Sitemap] and in the "Choose type..." selection box, select "Add General Web Sitemap".

Tick
[tick] I've created a Sitemap in a supported format. [?]
[tick] I've uploaded my Sitemap to the highest-level directory to which I have access.
[tick] My Sitemap URL is: [ ]

then enter the site feed URL into the "My Sitemap URL is: box. You can get the site feed url of your blog from SETTINGS. Click SETTINGS, SITE FEED tabs in the Dashboard. In the case of blogspot, just add /atom.xml to the end of the blog URL. (For example, the site feed URL of this blog is http://blogger-tricks.blogspot.com/atom.xml.) Then click "Add Web Sitemap" and you are done.

Use the feed URL. There are 4 possible feed URL for the New blogger:

http://yourblog.blogspot.com/atom.xml
http://yourblog.blogspot.com/rss.xml
http://yourblog.blogspot.com/feeds/posts/full
http://yourblog.blogspot.com/feeds/posts/default?alt=rss

substituting "your blog" with the actual name of your blog. The feed found by Feedburner for this blog are:

http://dwavesutd.blogspot.com/feeds/posts/default
http://dwavesutd.blogspot.com/feeds/posts/default?alt=rss

There is one further thing you can do, and that is to enable enhanced image search. At the bottom of the page, tick "Enhanced Image Search".

What does it mean to opt-in to enhanced image search? If you choose to enable enhanced image search, Google will use tools such as Google Image Labeler to associate the images included in your site with labels that will improve indexing and search quality of those images.

Ping Google sitemap
Now, whenever you update your blog, just ping Google sitemap by filling in the form below. Enter your blog feed url (***.blogspot.com/atom.xml) and click "Ping Google Sitemap" button.

Add A Graphic To Your Header

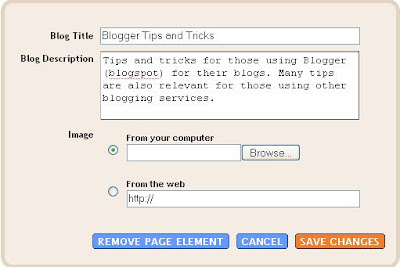
If you want an easy way to add a graphic to your Header, go to LAYOUT and click "Edit" on the Header Page Element. you will get a "Configure Header" pop-up:

New Blogger configure Header

You can either upload an image stored in your computer or enter the URL of a photo already hosted on the web. I have added a graphic to the header of Good Hobby Ideas. What I did was crop a section of a large image of the clouds. The image was saved in my computer so I click browse and located the image. I click "Save" and waited the image to be uploaded, then click "Save changes". The first time I did it, the width of the image was too wide for the width of the blog Header. So I went into the template editor (see Backing up and changing New Blogger template). From the CSS, I found this:

#header-wrapper {width:750px;margin:0 auto 10px;border:1px solid $bordercolor;}

which tells me that the width of the Header is 750 pixels. I opened the free and very good Irfanview free photo editor and resized the width of the image and save the image again. I deleted the original too wide image from the Header, then uploaded the resized image again, and you can see the result at Good Hobby Ideas. You will notice the image fits the Header nicely.

Publish Blog On Your Site

eXpertise of Getting free content for your blog posted a solution at the Google Blogger Help group (a public forum), which since I don't use FTP, I cannot test. However, I will just paste the solution he offered below:

 "You can use FTP to publish the blog on your own site. you can also customize the template to look like your own site. there is no need to use the api or any programming language. HTML/CSS/JavaScript is enough. learning the few custom blogger tags can also be helpful. you can see the help file and also seek help here."

 If Google had not disabled "reply to author" in all Google groups in which Google employees participate, I would contact him to let him know about this post. Since I can't do that, I will do the next best thing and comment in his post to let him know about this post and the link I put to his post.

Accidentally Deleting Blog

By accidentally deleting blogs are not rare occurrences as in the default BASIC tab for Blogger SETTINGS, the DELETE button is just below the SAVE SETTINGS button.

Previously, once you delete a blog, the blog URL become available for anyone to grab, and spammers have automated programs to quickly grab the URL of a deleted blog to use for spam blog (splog), taking advantage of any existing PageRank of a blog rather than starting from scratch. That was the reason for publishing this post - Why you should not delete a blog and what to do when you accidentally delete a blog or change the blog URL.

However, Blogger has wised up to this and now if you delete a blog, the blog URL is reserved for you to claim back later. So if you have accidentally deleted a blog, what you can do is to create a new blog using the old blog URL. Now I myself have not tried this when this was made known to me, and hope to do that one day and report the result at Testing Blogger Beta (now New Blogger). In the meantime, if you had accidentally deleted your blog, try this and please report the result by leaving a comment for everyone's benefits.

I have done this. I accidentally deleted my blog. I immediately re-created the same URL to protect it. As of yet I have no inclination that my blog was nabbed by spammers and such. It seems to have worked. I however; still am unable to contact blogger in any way for assistance. I've emailed support@ numerous times..politely...I've also filled out various contact forms found throughout the help sections and what not..many suggested via posts on your blog.
I hope someone o'er there somewhere listens..and contacts me and retrieves my blog..it is my lively hood..and this is just terrible.

Accountan Software

In making a financial statement, an accountant is required to produce accurate and precise data can be used as a reference and decision-making. With demands such as those mentioned, then an accountant requires a reliable accounting software. This is where the important role of Zahir Accounting as a provider of accounting software that will help accountants achieve an accurate and precise results of the financial statements that can be used as a reference decision-making.

dwavesutd.blogspot.com-dwijayasblog

Accounting software reliability presented by Zahir Accounting have been recognized. This is evidenced by several awards that were achieved as APICTA Indonesia Merit Award 2002, Winner 2003 and 2004 APICTA Indonesia, teknopreneur Award Winner 2008, as well as other prestigious awards including awards from the President of the Republic of Indonesia Mrs. Megawati Sukarnoputri because it has managed to become the Best of The Best Application APICTA Indonesia 2003.

You could look forward at Dwijayasblog.

Directory Blog

I want to give you hint about how to get your blog in famous.

Just read the article named Direktori-kan blog kamu.

direktori-kan-blog-kamu

Enjoy it.

Dwijayasblog

Let me tell you about a blog that you must know.

The blog name is Dwijayasblog.

dwavesutd.blogspot.com-dwijayasblog

Setup Blog in English

If I want to start a blog in English, I will use this address below:

https://www.google.com/accounts/NewAccount?hl=en&continue=http://www.blogger.com/create-blog.g&service=blogger&naui=8

dwavesutd.blogspot.com-setup-blog-in-english

Just try it for your new account in blogger. Happy blogging.